
Ever wished you could apply a set of rules to a group of campaigns? With content labels, you can.
Content labels allow you to group your campaigns the way your business thinks about them. You can filter and report by those groups, and set budget restrictions per group that the model takes into account when optimizing.
Jump to a section:
- What are content labels and label categories?
- What can you do with content labels?
- Ideas to get you started
- Set up your first label in 5 minutes
- Content status: “Need decision”
- How to set budget constraints
- Tips and tricks
- FAQ
What are content labels and label categories?
Label categories are your own dimensions for grouping campaign content, such as country, product category, or funnel stage. You name it!
Labels live inside a category. For example, the category “Country” can hold the labels CH, DE, and IT.
A label is a name, optionally paired with a matching rule. The rule uses the same filter engine as content rules and is case-sensitive. Once you save the rule, matching happens automatically: labels are updated whenever new contents are added, existing contents change, or new label rules are created.
Note: Labels are set at team level, so you can use them across all your portfolios.
What can you do with content labels?
- Filter and group easily: Organize your contents along the dimensions that matter to your business.
- Set budget constraints per label: Apply budget restrictions to a whole group of contents at once, for example to one market or to your brand campaigns. The model takes these constraints into account when optimizing.
- Get reporting tailored to you: See your performance the way you actually talk about it internally.

Define your labels once, then reuse them for filtering, reporting, calculated metrics, and optimization across portfolios.
Ideas to get you started
Not sure what to label? Here are a few ways teams can use labels.
Markets
Running campaigns in Switzerland, Germany, and Italy? Create a “Country” category with one label per market. Compare performance side by side, or give each market its own budget rules.
Brand vs. non-brand
Create a “Brand” category with the labels “Brand” and “Non-brand”. Keep an eye on each group separately, and protect your brand budget while the rest gets optimized.
Objective or Funnel stage
Create a “Funnel stage” category with labels that match your own funnel, for example “Awareness”, “Consideration”, and “Conversion”.
Product lines
Would like to group your campaigns by product category? Label campaigns by product line and compare how each one performs at a glance.
Seasonal promotions
Tag your Black Friday or summer sale campaigns, so they get their own view and their own rules, without touching your always-on setup.
Set up your first label in 5 minutes
First, decide on your structure: which groups of content belong together, and how would you like to filter them?
Let’s say you run campaigns across three countries. It makes sense to create a label category “Country” with one label per market: CH, DE, and IT.
- Go to Settings → Content labels.
- Choose the portfolio whose contents you’d like to label, or select “All contents”.
- Create a new category, for example “Country”.
- Add one label per market: CH, DE, and IT.
- Define a matching rule for each label. Depending on your naming convention, this could be: “Title” includes “IT_” or “it_”.
- Review the contents the rule proposes, then confirm or adjust them before anything is applied.
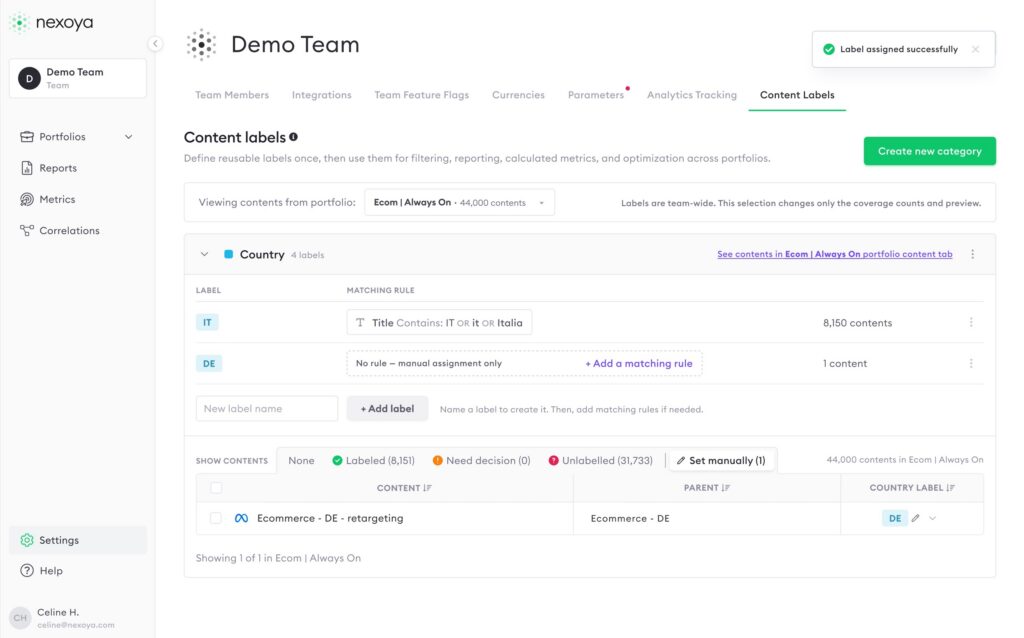
Prefer to do it by hand? You can also go through your unlabeled contents and assign labels manually. All your label categories appear there.
Content status: “Need decision”
For each category, a content has one of these statuses:
- Unlabeled: The content matches no label.
- Labeled: The content matches exactly one label, and the assignment happens automatically.
- Need decision: The content matches two or more labels. For simplicity, it shows as “unassigned” in analytics.
- Set manually: You assigned the label yourself. A manual assignment always overrides automatic matching.
Example: Say your “Country” category has the labels “CH” and “IT”, and you have a campaign called “CH_IT_Brand”. It matches both rules, so Nexoya can’t tell which label it belongs to and marks it as “Need decision”.
How to resolve it: Select the label the content should be assigned to.
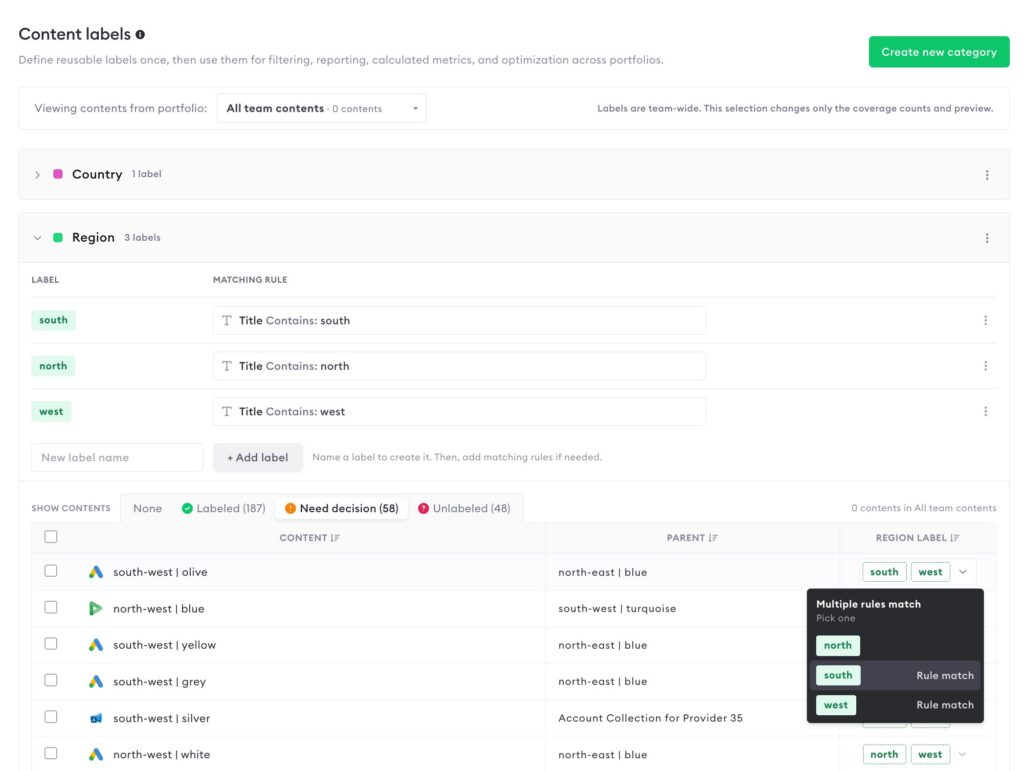
Good to know: If you create a new label whose rule accidentally matches many contents, some of them may move from “Labeled” to “Needs decision”. In analytics, you’ll see your “unassigned” spend growing.
How to set budget constraints
Once your labels are in place, you can use them to set budget constraints. The model takes these constraints into account whenever it optimizes.
Before you start: Budget constraints are built on the new content labels, because the labels form the groups you set constraints for. If you don’t see the Budget constraints tab in your portfolio settings, your team most likely isn’t using the new content labels yet.
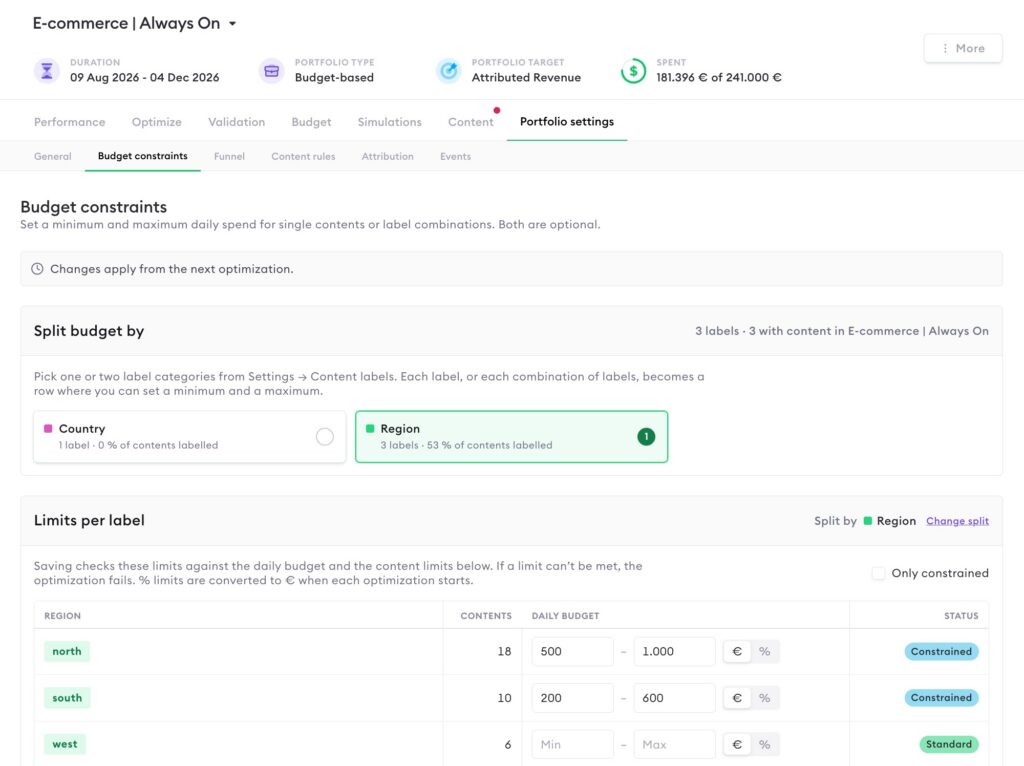
Where to find them: Go to Portfolio settings → Budget constraints. Here you manage your constraints, and the model uses them in your optimizations.
What you can set:
For each label, set a minimum and a maximum daily budget, either as:
- An amount, or
- A percentage of the final budget allocated for that optimization (only available for Budget portfolios)
Good to know
- Percentages are only available for Budget portfolios.
- Constraints are locked while an optimization is running, or while its proposal is pending. You can’t edit them in the middle of a run. Once the optimization is applied, you can edit the budget constraints again. If you need to change them sooner, you will need to discard the pending proposal first.
- Your constraints stay in place. They’re set per portfolio and carry over to every new optimization.
Tips and tricks
- Let your naming convention do the work. If your campaign names include the market, product, or funnel stage, a matching rule can label them for you.
- Mind the case. Rules are case-sensitive, so include both versions (for example “IT” or “it”), or some contents will be missed.
- Watch out for false matches. Rules match text anywhere in a name, even in the middle of a word. A rule for “it” would also pick up “Switzerland”. To avoid this, make your rule more specific by adding separators from your naming convention, such as an underscore or spaces. For example, use “IT_” or “ it “ instead of just “it”.
- Start small. Begin with one category, see how it feels, and expand from there.
- Use manual assignment for exceptions. Let the rule handle the bulk, then fix the rest in your unlabeled contents.
- Define once, use everywhere. Labels work across your portfolios, so you don’t need to set them up again.
- Check your “unassigned” spend. If the spend for a label looks smaller than expected, check whether your “unassigned” spend has grown. A rule that is too broad can push contents into “Need decision”, and their spend moves out of your labels.
FAQ
Will the rule be applied to new content I add?
Yes. If new content matches the rule, it is automatically assigned the relevant label.
Where will I see my labels in Nexoya?
You’ll find them in the Performance view, in Optimization, and in the Portfolio contents tab, where you can both manage labels and use them for filtering. To manage your labels in one place, go to Team settings → Content labels.
Can 1 content be assigned various labels?
Yes, but only one label per category. For example, a content can have one label from “Country” and one from “Funnel stage”, but not two labels from “Country”.
How many categories can I create?
As many as you need. There’s no limit to the number of categories, or to the number of labels within a category.
Can I edit matching rules later?
Yes, you can edit your rules at any time.
Can a content change labels automatically?
Yes, this can happen in two situations:
- You edit a matching rule, and the content now matches a different label.
- The content’s metadata, e.g. its name or bid strategy, changes while this is used for the content match.